![[pii_email_3e801984154af0e61e55]](https://latestdigitech.com/wp-content/uploads/2021/08/laptop-2838921_1280.jpg)
Table of Contents
- Introduction
- Video Guide
- EdbMails System Requirements
- Prerequisites for EdbMails Office 365 migration
- How to Migrate Office 365 Tenants Using EdbMails
- Download & Installation
- Login and Initial Steps
- Connect to Office 365 (Source)
- Select one of the Connection Methods
- Signing in to your Office 365 account
- Loading the Office 365 Mailboxes
- EdbMails Office 365 migration interface
- Selective folder, mailbox and mail items migration
- Connect to Office 365 (Destination)
- Select one of the Mailbox Mapping methods
- Verify the mailbox mapping and start the migration
- Office 365 tenant to tenant migration process
- Additional Export, Conversion and Migration Options
- EdbMails Office 365 migration: Trial vs. Paid Version Comparison
- Benefits of the EdbMails Office 365 migration Tool
- Reviewer’s Final Opinion and Verdict
Introduction
Transfer a large number of Office 365 mailboxes to a new domain or account
In this review, we will look at EdbMails tenant to tenant Office 365 migration tool, which can be used to transfer mailboxes between two Office 365 tenant accounts. If you want to migrate a large number of mailboxes in bulk under a single admin account, you should use a professional solution like EdbMails. Let us first gain a better understanding of tenant mailboxes before we begin the actual migration process.
In Office 365, there are administrator accounts, and each administrator account manages a number of users or mailboxes. All of these users are referred to as “tenants.” Each individual user’s mailbox is referred to as a tenant mailbox. However, in some cases, data must be transferred between user accounts. As a result, “Office 365 tenant to tenant migration” is a term that is frequently used.
Consider the following two fictitious companies: CompanyA.com and CompanyB.com. Each of the two companies has a unique set of Office 365 tenants. Following the acquisition of CompanyA.com, CompanyB.com intends to migrate its users to the former. This is a typical tenant-to-tenant migration process. Another scenario is if you want to move an Office 365 tenant from one country domain to another.
There are a variety of workarounds available to complete this operation. Regardless, data integrity and consistency must not be compromised at any cost. I spoke with a number of IT administrators who were in the same situation. Hearing their concerns and opinions about the migration process prompted me to look for a tool that could alleviate the burden. That is why I believe it would be advantageous if I shared my knowledge of the migration process with others.
Video Guide
In just a few minutes, the video below describes the entire Office 365 to Office 365 migration procedure.
EdbMails System Requirements
| Processor Requirements | Quad Core Intel CPU with 1GHz processor. 2.5 GHz required for optimum performance |
| RAM or Memory to install EdbMails | 512 MB minimum although 4GB highly recommended for optimum performance |
| Hard Disk Space | 20 MB for EdbMails installation and additional space for installation of Microsoft Visual C++ libraries and .NET components |
| Operating Systems Supported | Windows 11, 10, 8.1, 8, and all Windows Server Versions |
| Internet Connection | Required. T1 Connection |
| Microsoft Outlook | Required if exporting Office 365 mailboxes to PST |
| Microsoft Account Requirements | Any Licensed or Trial Office 365 account subscription with Mailbox Enabled |
| Public folder migration | A public folder must be assigned to the required user for the public folder migration. |
Prerequisites for EdbMails Office 365 migration
- Exchange Online’s administrator account must have an Office 365 license, and OWA must be available to the administrator.
- Both the source and destination Administrator profiles must be impersonated.
- An active mailbox must be present for each user and should be Mailbox enabled.
- EdbMails Office 365 migration tool sets the impersonation rights automatically if not set.
- If MFA is enabled for an account, use the app password for login instead of the regular account password.
How to Migrate Office 365 Tenants Using EdbMails
An administrator who wants to transfer an Office 365 tenant mailbox to another will appreciate the utility’s step-by-step working, which are listed below.
- Download and Installation
As with any Windows application, the download and installation are simple. To begin the download, go to the EdbMails official website and click the Download EdbMails button. The setup file is only 35 MB in size and downloads in a matter of minutes. When the download is finished, double-click the Setup.exe file to begin the installation. The installation procedure is also simple and quick, requiring no additional permissions.

- Login and Initial Steps
After the installation is complete, launch the EdbMails application and click the Start Your Free Trial button to begin using it. If you have purchased a license, you must log in using your username and password. To make things easier, EdbMails does not require a serial or activation key, but the license is tied to the email address you enter during the purchase process. Select Office 365 Migration from the main drop-down screen.

- Connect to Office 365 (Source)
The next step is to connect to your source Office 365 account. The modern authentication method employs OAuth 2.0 secure authentication, whereas the classic login method requires you to manually authenticate by entering your login credentials. There are two options on the modern authentication screen: Auto Registration and Manual Registration. The Auto Registration login page takes you to the official Office 365 account login page, where you must authenticate yourself. Manual registration requires you to manually authenticate yourself by providing your email address, application ID, directory ID, and so on. For the sake of illustration, we’ll use the Auto Registration method.
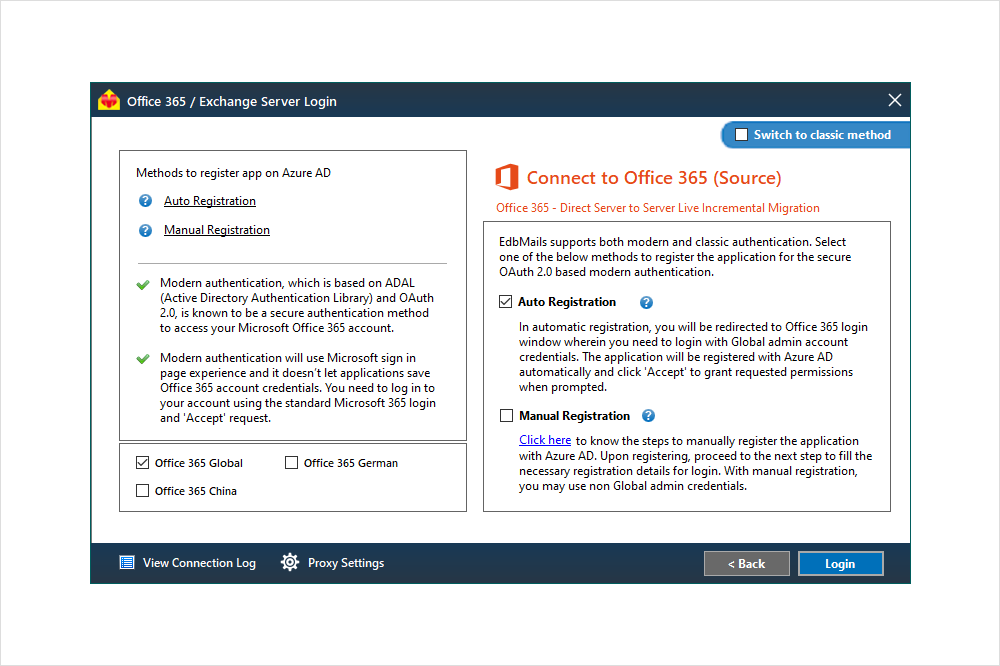
- Select one of the Connection Methods
In the next popup, you must choose among three options: Connect to Mailbox, Connect to Public Folder, and Connect to Archive Mailbox. Your mailbox must have a Public Folder and an Archive Mailbox enabled in order to connect to the Public Folder or Archive Mailbox. We’ll keep connecting to Mailboxes for illustration purposes, even though the steps for the other connection methods are very similar.

- Signing in to your Office 365 account
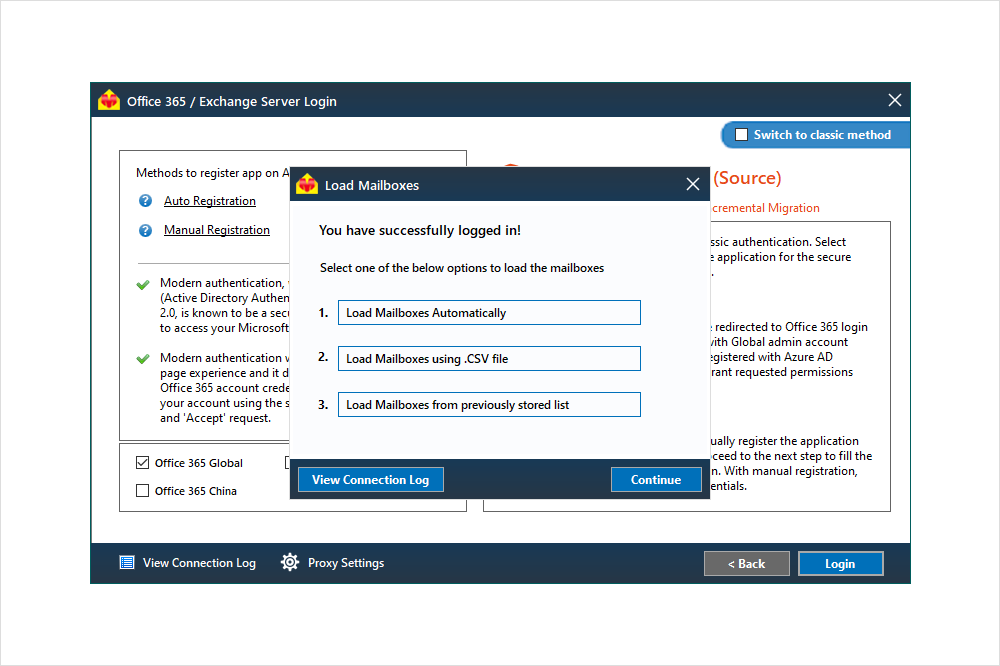
After you’ve selected a connection method, enter your Office 365 login credentials in the official Office 365 login screen. Accept the permissions and proceed.

- Loading the Office 365 Mailboxes
Your account will be validated, and the following window will display three options for loading the mailboxes. Mailboxes can be loaded automatically, from a .CSV file, or from a previously saved list. If you are a first-time user, stick to the first two options. In this example, we will proceed with the option of automatically loading the mailboxes. This loads it in real time and shows all of the mailboxes. If you have additional mailboxes that are not displayed in the list, use the CSV file to import them.
- EdbMails Office 365 migration interface
On the left side of the main EdbMails interface is a list of all the Office 365 mailboxes, which you can expand to view the different mail items and their count. The right side of the screen displays various options and settings, such as removing deleted source items from target folders and forcing target items to be updated with the source. Each option’s function is described in the tooltips. Other options include migrating permissions and Excluding Folders. Select the mailboxes and options that meet your needs, then click Migrate to Office 365 at the bottom. The various checkboxes allow you to select mailboxes and mail items without having to migrate everything.
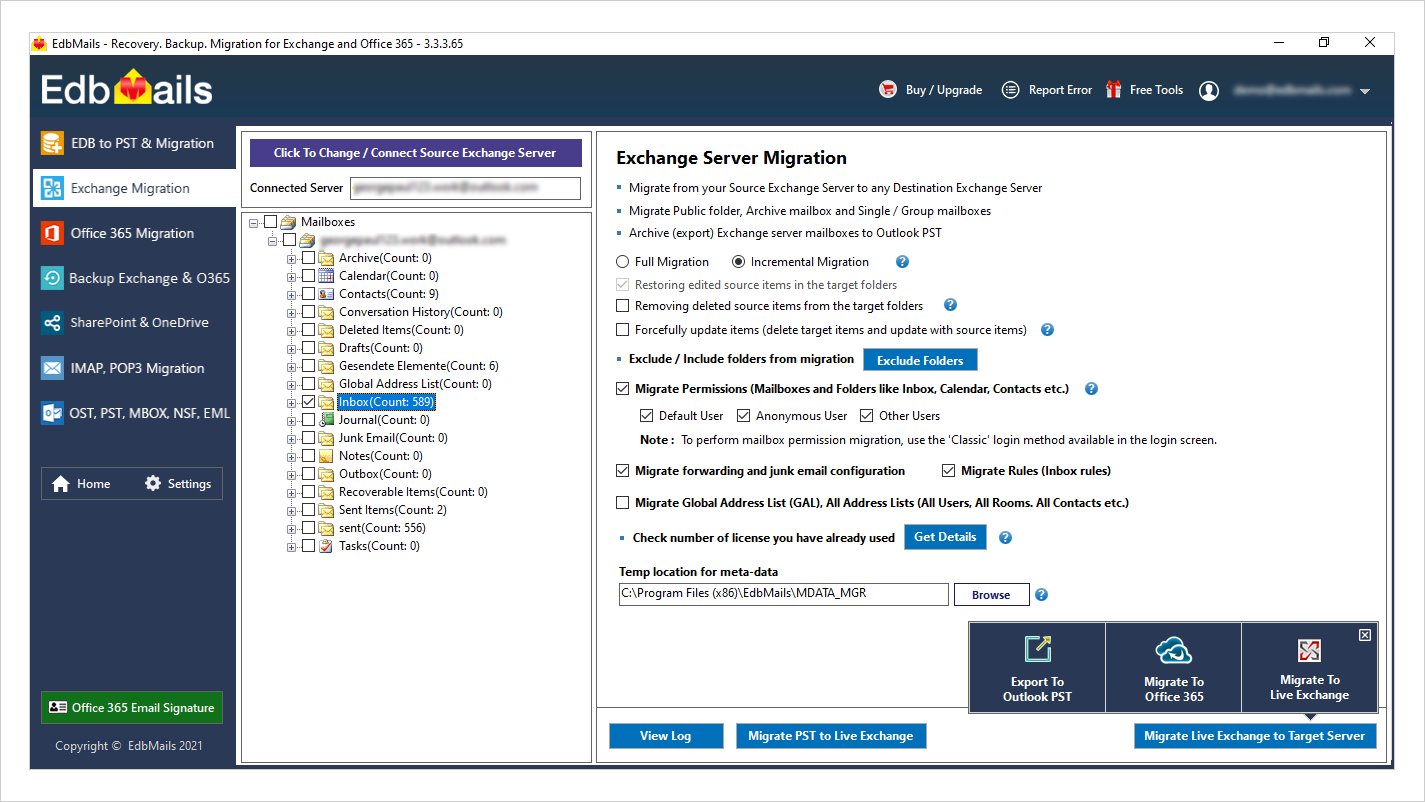
- Selective folder, mailbox and mail items migration
As described in the preceding steps, the Exclude Folder option allows you to filter mail items and folders. You can exclude or include standard or custom folders such as Junk, Drafts, and Sent Items, as well as filter mail items based on Date, Subject, From, Attachment, Messages, and Cc, as well as AND and OR customization. This feature was particularly appealing to us because it allows us to select and exclude items that we do or do not require.

- Connect to Office 365 (Destination)
After you’ve chosen your items and started the migration, you’ll need to connect to the destination Office 365 account. The steps and mailbox loading options are nearly identical to the source mailbox connection.

- Select one of the Mailbox Mapping methods
To map mailboxes, you must select one of three options in the following window. EdbMails includes an intelligent feature that automatically maps mailboxes with similar names or exact matches. When migrating a large number of mailboxes, this saves time. You can also map the mailboxes manually or based on a previous mapping if you prefer (if you have already performed migration to a target earlier)

- Verify the mailbox mapping and start the migration
Verify the mapping’s correctness in the mapping screen. If you chose the manual mapping method in the previous step, change the Action to Migrate and continue with the process.

- Office 365 tenant to tenant migration process
The EdbMails Office 365 migration tool begins the migration process, and the time it takes to migrate is determined by the number of mailboxes you have as well as the speed of your internet connection. A 1.5 GB mailbox took approximately 45-50 minutes to transfer in our migration scenario. What’s appealing is that EdbMails is a very light application that won’t slow down your computer. Even while performing the migration, we were able to open and use other applications. It does not even cause any downtime for your mailboxes, and you can continue to use them normally even during the migration. When the migration is finished, you will see a completion window and can view the entire migration history by clicking on the View Log button at the bottom. The text-based log file displays the number of mailboxes migrated, their count, and the success and failure of each.

- Additional Export, Conversion and Migration Options
EdbMails, in addition to Office 365 migration, provides a variety of other options and conversion options, such as EDB, OST, and Exchange migration. In this section, we’ll take a look at each of them individually. There are two other options at the bottom of your screen during Office 365 migration: Export to PST and Migrate to Live Exchange. This enables you to export your Office 365 mailboxes as an Outlook PST backup or to directly migrate Office 365 to another Exchange (Hosted, Hybrid, or on-Premise).

If you need to recover a corrupted EDB file or migrate mailboxes from an OST file, EdbMails’ EDB to PST converter and OST to PST converter can assist you. The various options are accessible via the main interface’s left menu. The steps are also simple; simply enter your corrupted or inaccessible file and click the Export to PST button at the bottom. There are also extra tools available, such as NSF and MBOX converters. With all of these different migration and conversion operations, EdbMails can legitimately be called an all-in-one software.
EdbMails Office 365 migration: Trial vs. Paid Version Comparison
Trial Version: Customers can use the trial version to get a feel for the software before purchasing it. As described earlier, by clicking the Start Your Free Trial button on the main screen, you can try out all of the software’s features at your leisure. With the trial version, you can migrate 30 items from each source’s folder to the target. This helps in testing the software’s efficiency and getting to know its working beforehand. EdbMails customer service is available 24 hours a day, seven days a week, and even offers a free live product demo so you can see the entire process in action if you prefer.

Licensed Version: After you are satisfied with the operation of the Office 365 migration tool, you can purchase an EdbMails mailbox migration license through a secure payment gateway. You can transfer an unlimited number of mail items from a single mailbox to an unlimited number of target mailboxes with the full version. The cost of 100 mailboxes is $200, but you can customize the number of mailboxes to meet your needs. It is also strongly advised to keep checking the official website for the most recent pricing plans and discount offers.
Benefits of the EdbMails Office 365 tenant to tenant migration tool
EdbMails, in my opinion, possesses all of the characteristics listed above. The product appears to have been designed with the user’s wants and needs in mind. Some of the advantages of using this utility are as follows:
- Easily transfer Office 365 and Exchange mailboxes from one domain to another.
- The software is compatible with all versions of the Windows operating system including the latest Windows 11 and 10.
- You can authorize and move mailboxes belonging to multiple people using EdbMails’ automatic impersonation feature of the Admin account.
- EdbMails supports all Office 365 license plans and all tenant to tenant migration scenarios.
- Free customer service available 24×7 and they also have a feature for remote assistance.
- Graphical interface without complex PowerShell commands simplifies the entire Office 365 tenant to tenant migration process.
Reviewer’s Final Opinion and Verdict
EdbMails Office 365 migration tool is a must-have for many businesses. It has become a popular choice for businesses and even home users due to its impressive array of capabilities and ease-of-use. One of EdbMails’ most impressive features is its ability to adapt to the needs of various users and use-case scenarios from a single interface. Due to the significant risk factor and impending downtime, a manual Office 365 migration approach is impractical. Furthermore, you can use this software to perform a variety of other recovery and conversion tasks, such as EDB to PST, OST, NSF. With so many functionalities under one roof, it’s no surprise that it’s an outstanding software out of the bunch that I’ve tested, and I’d like to rate it 4.9 out of 5 stars. (5 being the highest rating).
There is another excellent solution for Exchange and Office 365 users if you are looking to centralize adding email signatures for your company. Sigsync Office 365 email signatures makes it simple to register and add tenants, manage all your signatures from a single dashboard and customize rules for signatures and disclaimers. If you are interested to know more about Sigsync, follow the link above.